Git: Beyond Add, Commit, and Push

It seems that most people know the basics of github if you've been using it for a few weeks:

  • git add . - Stage all files that are in your current directy level and lower.
  • get commit -m "Some note" - Commit staged changes with some note.
  • git push remote_name branch_name - Push changes from a specific branch to some previoulsy named remote site.
  • git fetch remote_name branch_name - Download a specified branch from remote site.
  • git merge branch_bame - Combine code from specified local branch to branch that you are currently on.
  • git pull remote_name branch_name - FETCHES and MERGES remote branch into current local branch.

These commands are great to know but they aren't the most helpful when things start going wrong:


http://xkcd.com/1597/

And an important part of being a developer is breaking things and learning to fix them. Ocassioanly we'll break something very badly and need to back track a little to put it back together. This is an instance where knowing a little bit more about git can really help. Knowing what is saved, when it gets saved, how it gets saved, and how to use this information can be a powerful confidence builder. My knowledge of git has helped me feel free to break things knowing that I can at least always get back to where I started.

When is my code saved?

One of the first things really confused me is 'When does git save my code?'. I would make a new branch, start working and then realize that I hadn't actually switched to the new branch yet. Was my work saved to the master branch? Sometimes I would be working on one branch and that work would show up on ALL the branches.

Here is a quick example to demonstrate WHEN your code is actaully saved to a branch.

1 - Here I am in a fresh repo.

2 - I add a new file while on the master branch.

3 - Now I create a new branch called 'new-branch' and switch to it. I want to check and see if the file comes with me. After all, I made it while I was on the master branch, so maybe it should stay where it is.
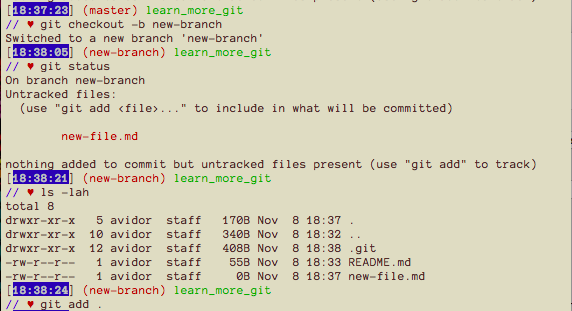
After switching to new-branch, I can see that my new file is showing up here as well. Git knows that it's a new file and I can plainly see it in the directory. Let's stage this file now by using git add ..

4 - Well, now that I staged (added) this file, surely it should stay on new-branch, right? Let's check.
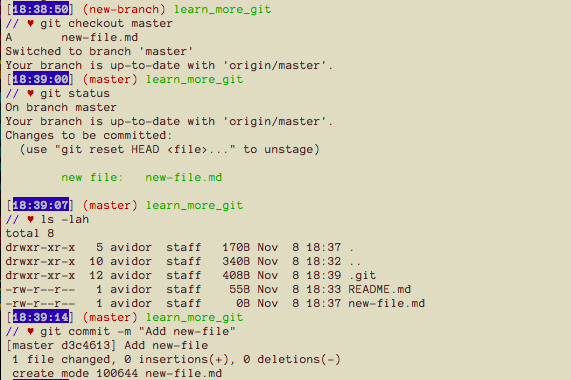
Well, it looks like adding the file didn't stop it from moving around when I switched branches either. Now I'll commit the file to the master branch.

5 - Just to check, lets make sure it's not still showing up on new-branch.

GOOD! The file is finally acting as I suspected.

This shows that no matter what branch you were on when you created a file, made changes to a file, or even stage something, it does not become attached to a branch until you commit the changes.

Where does my new-file go when I leave the master branch?

Good question. They are actually stored in the directory .git. Go take a look at some of those previous screen shots. When I list the contents of my project folder, there is always a .git file. All the changes that I make between branches are stored using a 40 character long hex hash. Take a look at git's files for each branch.
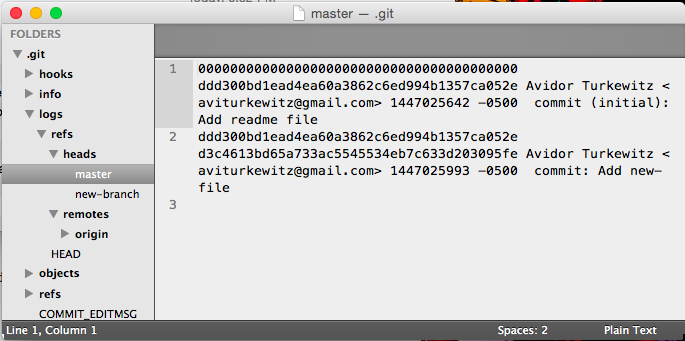
And now lets take a look at the file for my new-branch
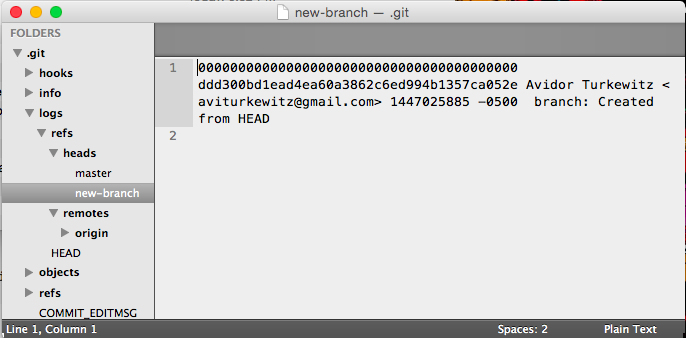
We can see each hash associated with each commit on each branch.

Some other interesting information to take a look at here is the config file.
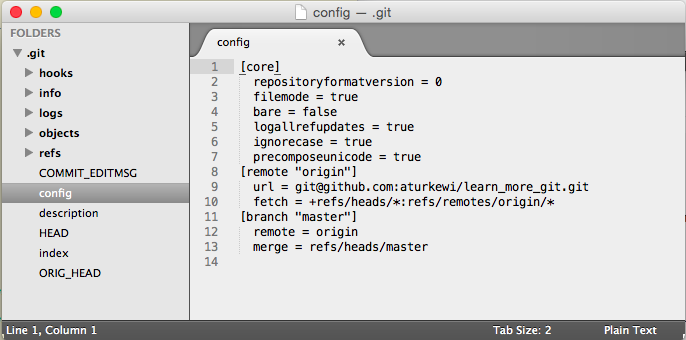
Here in the config file you can see your remote url as well as a few other bits of information. If you ever find that you need to change your remote name or URL, you can always just open up this config file and manually change it.

So far I haven't gone over any 'complex' git commands, but its all useful information to know to better understand the tool we are working with. The more you understand about it, the more comfortable you can be with it. But still, there are some more useful commands to know beyond commit, add, and push.

What to do if you've made a mistake

One mistake that I sometimes make is commiting to a branch when I did not mean to.

A good thing to remember is that you can ALWAYS roll back with git, that's the whole point. So in this case, I just made an empty file on the wrong branch and I want to delete it. First, take a look at git log to see how far back I want to go and get the commit number (the seven digit number to the left of the commit message). Then use the command git reset --hard [commit number]. This will roll back your current branch to that specific commit.

Now we can see that the file we created no longer exists!

A few more useful tools

Some ohter useful commands that I've come across are git log --oneline --decorate --graph --all and git merge --abort. The flags attached to the git log allow you to see a quick and nice-ish visual of what all the branches look like for your project.
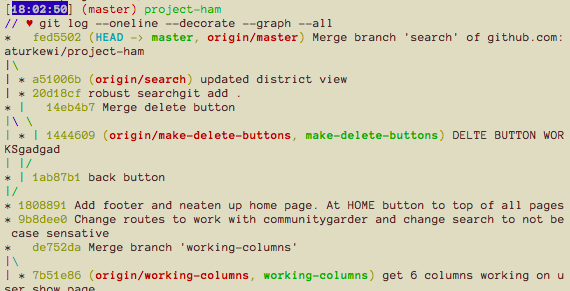
This is rendered in the terminal after all, but it's not a bad representation.

And finally git merge --abort. This command will revert to a pre-merge state (exactly what you would think it would do). It's greate if you merge a branch that wasn't ready or all of a sudden see a whole bunch of merge conflits that will need further follow up.

There are many more git commands and tools out there beyond these meager few. If you think there might be something that git can do to help you out, search for it. The more comfortable you feel with git, the more comfortable you will feel with programing.

Quick Flatiron Tip

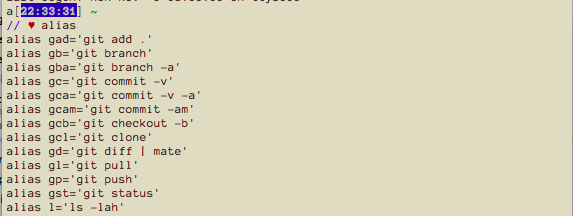
One more quick tip for my Flatiron School class. If you're looking to improve your speed in working with git, try typing alias into your console. You get a whole bunch of pre-loaded github shortcuts. These are all stored in your .bash_profile in your root directory and you can easily create custom ones for yourself by simply copying the syntax.
Sources: https://git-scm.com/book/en/v2/Git-Branching-Branches-in-a-Nutshell source: http://www.javaworld.com/article/2113465/developer-tools-ide/git-smart-20-essential-tips-for-git-and-github-users.html

The Problem: My Website Looks Terrible

I'm finally starting to get my ruby apps connected to web browsers and they look terrible. So far it's just simple forms that tie back into a database (fun stuff), but as far as aesthetics, there's nothing there. I know some basic HTML and CSS so that I can give my site some color, some background images, and maybe even some columns (though it would probably take me a bit of time). I really don't want to invest the time to build everything out making columns, remembering to use clear-fix or the box-in-box method. Lucky for us, there is Bootstrap.

The Solution: Bootstrap

Bootstrap is an HTML, CSS, and JavaScript framework. It was originally developed by Twitter and was released in 2011. Since it's release it has become the most popular front-end framework and open source project in the world. As of January 2015 it was the most popular development project on GitHub. The Bootstrap framework has become so popular in part to its responsive design. The framework allows the web page to re-size with the browser as well as conveniently fit on the screen of a mobile device.

Getting Bootstrap CSS and JS Implemented

After a bit of work it was easy enough to get the CSS and JS to work with the website that I built with Sinatra. You just have to make sure that the CSS and JS files are stored in a folder titled 'public' on the top level of your directory and then just require the CSS sheets in your HTML file:

<head>
  ...
    <!-- Bootstrap Core CSS -->
    <link href="/css/bootstrap.min.css" rel="stylesheet">

    <!-- Custom CSS -->
    <link href="/css/bootstrap-theme.css" rel="stylesheet">
  ...
</head>

It's great to have access to such a robust CSS, but it still left me with implementing it. The Boostrap CSS file stylizes HTML tags, so just adding it to my site made a small improvement. Fonts and buttons now looked a little more modern, but I wasn't really feeling the magic yet. To really get a nice looking site with Bootstrap I would still have to go through adding columns, nav bars, headers, footers.... Again, I really wasn't looking to spend all that much time on this. Again, lucky for us, there are Bootstrap themes.

Using Bootstrap Themes

Googling around yielded many pre-built Bootstrap themes available for download. After finding one that looked nice I was able to download the pre-built page and work with it. Again, I had to make sure that my dependant files such as CSS and JS were in my 'public' folder. In addition, I also made an 'images' folder inside my 'public' folder to store any images that would be used on the site. This was finally the solution that I was looking for. With a small amount of work, I am now able to make simple web pages that aren't too bad to look at.

Further (Simple) Customization - Pingendo

After doing a bit of work with my first Bootstrap site, Austin Gilmour tipped me off to a program called Pingendo. Pingendo allows the user to visually build a website by dragging and dropping elements into a matt. This allows the user to quickly and easily add/remove objects such as a full width picture, nav bar, header, text sections, etc.... While I haven't yet gotten the chance to use the program, it looks like a great program to try out next.

Pros and Cons of Bootstrap

Pros:

  • Easy to set up and get going
  • Developer is not required to be a designer to get a nice looking site off the ground

Cons:

  • Website start to look the same if some one doesn't eventually go in to customize.
  • Re-working the design and keeping it clean and readable can be difficult given the amount of CSS that comes with Bootstrap files.

Sources:

The Ruby Community and Bundler

As I enter my second week at The Flatiron School my interest in learning about Ruby and the tools that I need to be a web developer continues to grow. I figured that since I can't always read text books on the train, perhaps some one might know some good Ruby podcasts that might be good to check out; Vinny to the rescue.

Ruby Rogues

Ruby Rogues is a weekly pod cast panel discussion that talks about Ruby, Rails, and many associated tools, libraries, and careers. After listening to a bit of the most recent episode, I figured I might not yet be ready to parse everything these guys have to throw at me. Instead, I started looking through the list of old episodes to try and pick out some that might be more my speed. In doing this, I found Episode 224 - Ruby Together with Andre Arko. This episode goes a bit in to talking about the Ruby community, RubyGems.org, and more specifically about one of the few gems I've actually heard of and worked with, Bundler.

Bundler


What is bundler?

A quick aside about bundler in case you don't know what it is. Bundler is the Ruby gem that lets you quickly and easily download all the dependant gems that you need to run your app by simply typing bundle install (assuming whoever developed the app used the bundler gem of course). Not only does bundler allow you to get all the gems that you need, it also ensures that you have the correct version of the gems as well. I don't know about you, but this seems pretty important.


To be specific, this episode hosted Andre Arko, part of the bundler core team. He talked about the challenges of trying to keep bundler up to date and working given that it is an open source software. I was surprised to learn that this essential tool that is used by for profit companies was at first only being maintained by people in their spare time.

Andre went on to talk about the group he is working with called ruby together which was created this past March. It's a small group that is funded by individuals and corporate sponsors to keep this essential tool in good working order. From listening to the podcast, it seems that there is a lot of open source Ruby work that is simply maintained in peoples spare time.

At the moment, I don't have the money, time, or skill required to help out, but I'm still interested to start seeing what the upcoming Ruby landscape looks like for me.

Find a String

Find a String

So I’m building this blog using GitHub Pages and I wanted to update the theme. Simple enough. I picked a theme (HPSTR), followed some instructions, and boom, I’ve got a new theme. Everything looked pretty good, except the title on my browser tab. The title still showed the stock text. I checked my _config.yml file, but my title wasn’t getting coppied over. Looked like I have to chage it somewhere else, but where? There are a lot of files in this repo and after looking through a couple, I realized that I must be going about this the hard way. Perfect time for a lecture on bash. The easy answer was grep. After googling through some flags I found out how to easily find where this text was stored.

grep -r "My string" .

The -r tells my terminal to return the file name rather than the line of code where the string showed up. The string is what I’m looking for (the original title of the page that I wanted to change). The period at the end tells grep to search the folder I am in and all folders on a lower leve. After this quick line of code in terminal, I quickly found all the locations where the old title was stored.

My First Post Using Github Pages

The Flatiron School

Day 1

I just finished day one at The Flatiron School.

It’s been almost 5 months since I started to first seriously consider changing career paths. It’s been almost 3 months since I got accepted to the school I wanted to learn at. It’s been a month since I’ve moved to New York and a week since I’ve finished my pre-work. All the while the anticipation to stark working as been building.

The first day has been excellent. We started off by doing collaborative work on a web page using git hub to help us manage all the simultaneous version. After a couple of lectures and some team building I started building this blog using Octopress and Jekyll. Not entirely sure how to use this all yet, but I suppose that’s the point, I’ll be learning as I go.

def new_method
  puts "Something"
end

I am using Jekyll and github pages so taht I will easily be able to insert code snippets as seen above.