Building My First Chrome Extension

It's been a good long while since I created a blog post on here, so I figured I really had to get back to it. Today I want to go over something that I've been meaning to do for ages and when I finally sat down to do it, it took remarkably little time. I'm talking about building my own Google Chrome Extension.

For the purpose of this blog, I'm going to talk about a simple extension to solve the problem of "I mean to click copy on that email link, but now Apple Mail is opening up :face_palm:" (this is something I never actually want to happen). The plan? Create an extension that would over-ride the mailto: and just copy the address to my clipboard instead. Going into this, my plan is to basically be able to write some sort of javascript file that will take care of the copying when I click on one of these links.

Feel free to checkout emailTo:Clipeboard

The key parts of a Chrome Extension

The Manifest

I started off using Google's docs on how to build a chrome extension.

The absolute minimum thing you need to create a Chrome Extension is a manifest.json file that has a format that looks like this:

{
  "manifest_version": 2,
  "name": "eMailTo:Clipboard",
  "version": "1.0"
}

All we need to have is the version of the manifest, the name of your extension, and the version of your extension. Great! We have the bare minimum :)

As I mentioned above, I'd like to run some javascript on every page that that will over-ride the default mailto: action. Going through the docs on the manifest and looking at other chrome extensions, I found that I needed to use the "content_scripts": key in the manifest to run scripts. The bare minimum for this is to have an array of objects that have "matches": [] (an array of URLs that we would like our JS to be run on) and "js": [] (an array of js files that you'd like run).

I think I can fit all the javascript required for this into one file that I'll call index.js. I want this to run on all webpages (seriously, I never want any mail app to open when I click on an email address), so my manifest now looks like this:

{
  "manifest_version": 2,
  "name": "eMailTo:Clipboard",
  "version": "1.3",

  "content_scripts": [
      {
      "matches": [
          "http://*/*",
          "https://*/*"
          ],
      "js": ["index.js"]
      }
  ]
}

I do want to add one more optional key to the "content_scripts", and that's "run_at": <option>. Here I want to make sure that my javascript doesn't load until the DOM is on the page. To do this, I add "run_at": "document_idle". You can get a full list of options on the page linked above about content_scripts.

The final bit that I want to add is mostly cosmetic; it's the icon at the top of the browser and what happens when it's clicked! There are two options to set this up, "browser_action" and "page_action". A page action is usually used for an extension that is only active on some pages. Given that what I want to build here should be active on all pages, I'm going with "browser_action".

There are two keys that I need to build this, the icon, and the popup that displays when some one clicks on my icon:

"browser_action": {
  "default_icon": "email-to-clipboard-logo.png",
  "default_popup": "popup.html"
}

Simply create a logo and add the path to it at "default_icon" and create a simple HTML page to show and input the path for that at "default_popup" and you'll be all set!

With everything all said and done, this is what my manifest.json looks like in the end:

{
  "manifest_version": 2,

  "name": "eMailTo:Clipboard",
  "description": "This extension overides the html mailto: default and copys the email to your clipboard instead.",
  "version": "1.3",

  "browser_action": {
    "default_icon": "email-to-clipboard-logo.png",
    "default_popup": "popup.html"
  },

  "content_scripts": [
      {
      "matches": [
          "http://*/*",
          "https://*/*"
          ],
      "js": ["index.js"],
      "run_at" : "document_idle"
      }
  ]
}

File Structure

I don't want to spend too much time in this post going over the specific javascript, but I'll go over the file structure and how I generally laid it all out.

├──email-to-clipboard-logo.png
├──index.js
├──manifest.json
├──popup.html

This is generally what the index.js (check out the link for the full and current version) file looks like:

function copyTextToClipboard(text) {
  // some cool code that allows you to pass in text and copy text to clipboard
  // shoutout to http://stackoverflow.com/a/30810322 for the copy code below
}

const listenForMailtos = () => {
  // attach listener to <body> and copy text for any clicks on `mailto:` links
}

listenForMailtos();

And I'm just using the HTML popup to direct people to the repo:

<!doctype html>
<html>
  <head>
    <title>eMailto:Clipboard</title>
  </head>
  <body>
    <div>
      Checkout the repo at <a href='https://github.com/aturkewi/mailto-overide'>https://github.com/aturkewi/mailto-overide</a>
    </div>
  </body>
</html>

I was able to verify that everything was working properly by opening Chrome and then going to my extensions. From here, I clicked on the "Load unpacked extension..." button and selected the directory where I was saving all of these files.

load unpacked extension

When you try and load your extension, you'll get any errors that are thrown from your manifest. If there are no errors thrown, you'll see your icon show up in the browser and you can start test driving it on some web pages!

Once you've finished all the tweaking, you're ready to publish this extension to the Chrome Web Store :)

Uploading and Publishing!

To publish your extension, you'll need to create a zip file. The way I decided to do this was to create another directory in my file structure called releases where I can store the different versions of my zips :)

There are many ways to zip up your extension, but I'm just going to go over the option I went with.

Note: This will work on Mac (and maybe Linux?), but probably will not work on Windows.

Type in zip releases/emailto-clipboard-v1.0.zip email-to-clipboard-logo.png index.js manifest.json popup.html. This will create a zip file for you with everything you need. Check out this StackExchange article for more on the zip command. If you are unable to use this command or do not like this process, you can also use Chrome's built in "Pack extension..." button (conveniently located right next to the previously mentioned "Load unpacked extension..." button).

Finally, head on over to the Chrome Web Store Developer Dashboard and upload your extension!

You now know everything you'll need to know to get your first extension published to the store! Please feel free to take a look at the repo for eMailto:Clipboard if you'd like to see how my repo is working right now and let me know if you have any comment or questions below!

Advanced Active Record Queries

When I went through the immersive course at The Flatiron School, I found that learning and using some advanced Active Record queries was difficult. I am now in my first week as an online web instructor for The Flatiron School and the first study group that I sat in on was going through this very topic. It is still confusing.

I want to go over some tips and tricks I found useful as well as a few examples.

Understanding what Active Record Queries and Arel Are

Note: If you are interested in following along and playing around with this data, you can grab it all here: https://github.com/aturkewi/shoppingExperience

Arel is a library that active record uses to allow us developers to write seemingly simple lines of code that are then converted into some database query language such as SQL. Another thing that is really nice about it is that we can write our query with Active Record and Arel will take care of converting our query to the language that is used by the database.

Here is an example. If we have a class User that has_many of a class Product, then we can write this Active Record query, User.first.products.order(:name), to get all of a user's products sorted by name. Arel will then convert that to 2 SQL queries for us. Take a look at the example below:

2.2.0 :004 > User.first.products.order(:name)
  User Load (0.3ms)  SELECT  "users".* FROM "users"  ORDER BY "users"."id" ASC LIMIT 1
  Product Load (0.7ms)  SELECT "products".* FROM "products" INNER JOIN "line_items" ON "products"."id" = "line_items"."product_id" INNER JOIN "carts" ON "line_items"."cart_id" = "carts"."id" WHERE "carts"."user_id" = ?  ORDER BY "products"."name" ASC  [["user_id", 1101]]
 => #<ActiveRecord::AssociationRelation [#<Product id: 327, name: "Ergonomic Granite Pants", price: 625, created_at: "2016-03-01 15:30:27", updated_at: "2016-03-01 15:30:27">...
You can see this happen by running the command in your terminal. If we take a look, we can see that the first SQL query is the `User.first` part of our Active Record Query. This query gets all of the columns (`SELECT "users".*`) from our Users table (`FROM "users"`). It then orders them by their ID (`ORDER BY "users"."id"`), and then grabs the first one (`ASC LIMIT 1`). Active Record and Arel then build the next part of our line of code, `.products` (`SELECT "products".* FROM "products"`) to select products. It automatically joins our users table to our products table (`INNER JOIN "line_items" ON "products"."id" = "line_items"."product_id" INNER JOIN "carts" ON "line_items"."cart_id" = "carts"."id"`). It then finds all products linked to the given user, and sorts them alphabetically (`WHERE "carts"."user_id" = ? ORDER BY "products"."name" ASC [["user_id", 1101]]`). This gives us a quick idea of how powerful Active Record Queries and Arel can be. ## What Active Record Queries Returns By default, Active Record Queries only return an array (or more accurately an ActiveRecord::Associations::CollectionProxy) or an instance of the object you called the search on. Here is a quick example to demonstrate this point. If I want all the data from the first product in my products table, I can do this:
2.2.0 :056 > Product.select("products.*").first
  Product Load (2.1ms)  SELECT  products.* FROM "products"  ORDER BY "products"."id" ASC LIMIT 1
 => #<Product id: 318, name: "Gorgeous Plastic Car", price: 298, created_at: "2016-03-01 15:30:27", updated_at: "2016-03-01 15:30:27">
That's great, that's just what I wanted and exactly what I would expect it to return. But what if I just want the name? I would probably try the following:
 2.2.0 :058 > Product.select("products.name").first
   Product Load (1.0ms)  SELECT  products.name FROM "products"  ORDER BY "products"."id" ASC LIMIT 1
  => #<Product id: nil, name: "Gorgeous Plastic Car">
Hmmmm. I got the name, which is what I wanted, but Active Record returned to me a Product object that's just missing the other data. Ok, let's try something a little different. Now let's try getting a list of product's prices that a User bought. I would try something like this:
 => #<ActiveRecord::Relation [#<User id: nil, name: "Ergonomic Granite Pants">, #<User id: nil, name: "Incredible Granite Computer">, #<User id: nil, name: "Gorgeous Rubber Gloves">, #<User id: nil, name: "Sleek Plastic Gloves">, #<User id: nil, name: "Gorgeous Cotton Pants">, #<User id: nil, name: "Small Steel Chair">, #<User id: nil, name: "Incredible Wooden Hat">, #<User id: nil, name: "Sleek Rubber Gloves">]>
2.2.0 :063 > User.select("products.price").joins(carts: { line_items: :product}).where("users.id = ?", 1101)
  User Load (1.1ms)  SELECT products.price FROM "users" INNER JOIN "carts" ON "carts"."user_id" = "users"."id" INNER JOIN "line_items" ON "line_items"."cart_id" = "carts"."id" INNER JOIN "products" ON "products"."id" = "line_items"."product_id" WHERE (users.id = 1101)
 => #<ActiveRecord::Relation [#<User id: nil>, #<User id: nil>, #<User id: nil>, #<User id: nil>, #<User id: nil>, #<User id: nil>, #<User id: nil>, #<User id: nil>]>
Ok, a bunch of nil User objects... What did my query even return? It's clear that whatever I wanted, Active Record is only going to return to me User objects here. It's important to keep in mind here that when you make a SQL query, you're generally specify a table that you want returned (if you're unfamiliar with this, I recommend checking out [Khan Academdy's SQL course](https://www.khanacademy.org/computing/computer-programming/sql)). Active Record is simply trying to fit the table returned into the object type you're calling the query on. >Note: My general rule of thumb is that if I want my return value to be ObjectX, then call my query on ObjectX as well. Because of this, it can sometimes be difficult for us to tell what table our SQL query is really creating. It would be really nice if we can see that... ## Viewing The SQL Query in a GUI To solve this problem, I sometimes like to look at my SQL queries in a GUI (Graphical User Interface). Currently I use [SQLiteBrowser](http://sqlitebrowser.org) . Using this program I can run my raw SQL queries to see what I'm really getting back. Looking up to the previous example where I wanted a list of product prices, you can see in the code snippet that the console actually outputs the raw SQL query. If I take that query and put it into SQLiteBrowser, I can now see the table that the database is returning:

SQLBrowser Output

This very clearly shows me that my SQL query created by Active Record and Arel returns the above table. The above table was then converted into User objects. Because there is no way to add price: to a User, they all came back nil and we were none the wiser to the table that our SQL returned. You'll even notice that there were 8 nil User objects returned and SQLiteBrowser shows in the bottom box that there are 8 rows returned here. Clearly there was one nil User returned for each Product price. SQLiteBrowser can be used anytime you are confused about what data you are actually calling back from the database when you are writing complex queries.

Advanced Queries

Here are some advanced queries that are sometimes a bit tricky.

#pluck()

One of the Learn students, Brett Heenan brought my attention to the #pluck() method. This will pull out specified attributes from an Active Record query. This method would be perfect for the previous example where I was trying to get all of the products prices owned by a user. Let's give it a try:

2.2.0 :064 > User.select("products.price").joins(carts: { line_items: :product}).where("users.id = ?", 1101).pluck('products.price')
   (7.4ms)  SELECT products.price FROM "users" INNER JOIN "carts" ON "carts"."user_id" = "users"."id" INNER JOIN "line_items" ON "line_items"."cart_id" = "carts"."id" INNER JOIN "products" ON "products"."id" = "line_items"."product_id" WHERE (users.id = 1101)
 => [625, 612, 658, 101, 166, 102, 893, 923]
If we take a look, we can see that the raw SQL queries are exactly the same! Pluck allows use to specify what data we want to return from the table that the SQL query created. ### `sum()` To change tracks a bit here, I've always found it difficult to get values that were grouped and summed from these advanced SQL queries. Lets try and get all of the users that have spend more than 5600 on products. I would also like to shout out to another Learn student [Lisa Marie](https://github.com/lisamarie616) who's code snippet for a different `sum()` helped me better understand this tool. Now, my first step here is to get users and products on the same table together. I know I'm looking to get back Users as my return value, so I'll be calling this query on User. I also know that all I need from my products table will be price (I don't care about the name of the product). This is a complex query, so let's just start by trying to get this to show up in SQLiteBrowser first. (I'm using my terminal to convert my Active Record query into SQL). I decided to order my results by user's name as well so that I'll be able to see all their rows together.
2.2.0 :075 > User.select("users.*, products.price").joins(carts: { line_items: :product}).order("users.name")
  User Load (14.3ms)  SELECT users.*, products.price FROM "users" INNER JOIN "carts" ON "carts"."user_id" = "users"."id" INNER JOIN "line_items" ON "line_items"."cart_id" = "carts"."id" INNER JOIN "products" ON "products"."id" = "line_items"."product_id"  ORDER BY users.name
  => #<ActiveRecord::Relation...

Users joined to Products showing User info and Product price

This is a good starting point. Next we know that as we are interested in price total per user, we know we will have to group our data by user. So lets add a .group("users.id") to our query.

2.2.0 :076 > User.select("users.*, products.price").joins(carts: { line_items: :product}).group("users.id").order("users.name")
  User Load (5.7ms)  SELECT users.*, products.price FROM "users" INNER JOIN "carts" ON "carts"."user_id" = "users"."id" INNER JOIN "line_items" ON "line_items"."cart_id" = "carts"."id" INNER JOIN "products" ON "products"."id" = "line_items"."product_id" GROUP BY users.id  ORDER BY users.name
  => #<ActiveRecord::Relation...

Grouping by user.id

Awesome, we're making some progress as our users are all grouped together but the price column no longer makes sense. It looks like it's only showing the price of the last item a user bought. Now it's time for us to use sum. Now we don't want the sum of a whole column, but rather the sum for a given user (or row). To do this we add the call to sum to the SELECT portion of the Active Record query just as we would have done with a raw SQL query. I'm also going to add a name for this column so that we can easily manipulate it later if we need to. Our select method now reads select("users.*, sum(products.price) as 'users_total'"). Let's see what this does:

2.2.0 :077 > User.select("users.*, sum(products.price) as 'users_total'").joins(carts: { line_items: :product}).group("users.id").order("users.name")
  User Load (5.2ms)  SELECT users.*, sum(products.price) as 'users_total' FROM "users" INNER JOIN "carts" ON "carts"."user_id" = "users"."id" INNER JOIN "line_items" ON "line_items"."cart_id" = "carts"."id" INNER JOIN "products" ON "products"."id" = "line_items"."product_id" GROUP BY users.id  ORDER BY users.name
  => #<ActiveRecord::Relation...

Sum price

Woo! We now have the total each customer spent. Now we just have to say that we only want the ones that spend more than 5600. Lets also order it by their totalspent in descending order. To do this, we just have to get rows `having("userstotal > 5600")`. (See why it was useful to name that column now?).

Note: Just as with raw SQL, when using #group() you have to filter by using #having(). If you are not using group, then you can filter by using #where()

2.2.0 :081 > User.select("users.*, sum(products.price) as 'users_total'").joins(carts: { line_items: :product}).group("users.id").order("users_total desc").having("users_total > 5600").order("users_total desc")
  User Load (3.4ms)  SELECT users.*, sum(products.price) as 'users_total' FROM "users" INNER JOIN "carts" ON "carts"."user_id" = "users"."id" INNER JOIN "line_items" ON "line_items"."cart_id" = "carts"."id" INNER JOIN "products" ON "products"."id" = "line_items"."product_id" GROUP BY users.id HAVING users_total > 5600  ORDER BY users_total desc
 => #<ActiveRecord::Relation [#<User id: 1134, name: "Marguerite Flatley", created_at: "2016-03-01 15:30:27", updated_at: "2016-03-01 15:30:27">, #<User id: 1131, name: "Mr. Elda Ritchie", created_at: "2016-03-01 15:30:27", updated_at: "2016-03-01 15:30:27">, #<User id: 1182, name: "Ms. Annabel Nienow", created_at: "2016-03-01 15:30:27", updated_at: "2016-03-01 15:30:27">, #<User id: 1124, name: "Hipolito Wiegand", created_at: "2016-03-01 15:30:27", updated_at: "2016-03-01 15:30:27">]>

Filter out only high rollers and sort by users_total

All right, we did it! We wrote a complex Active Record query to get all of the users that spent more than 5600.

Closing Thougts

Some important tips to remember when crafting complex Active Record queries:

  • Take it step by step, you don't have to write the whole thing out in one go
  • If you're not sure what your query is actually returning, look at it in a GUI
  • If you are more comfortable with raw SQL, it's OK to start by writing that out first and getting it working and then trying to work your way back to the Active Record syntax.

At The Flatiron School we learned some web scraping. To locate a specific item on the page we used CSS selectors. Recently I have learned about another way to select items on a page called XPath. These two ways of selecting page elements seemed to fill the same function, so I wanted to look and see if one was faster than the other.

First, a quick look at each one.

Some example html to look at...

1
2
3
4
5
6
7
8
9
<body>
  <div id='primary-title'>
    <h1>Class notes</h1>
  </div>
  <div class='notes'>
    <p>Webtwo ipsum dolor sit amet, eskobo chumby doostang bebo.</p>
    <p>Voki zapier mzinga foodzie spock. Dopplr sifteo rovio.</p>
  </div>
</body>
##CSS [CSS selectors](http://www.w3schools.com/cssref/css_selectors.asp) are built to easily select elements with the same syntax you would use for CSS. For example, if I wanted to select an element with 'id=primary-title', all I would have to use is `"#primary-title"`. If I wanted to select all `

` tags with 'class=notes', I would have to simply use `"p.notes"`. If you are familiar with CSS, this should all be very familiar to you. An important thing that CSS cannot do that XPath can is move upwards from a given element. This means once I have selected the `

` tags with 'class=notes', I cannot go back and access the '' tag without starting from the full page again. ##Xpath [Xpath selectors](http://www.w3schools.com/xsl/xpath_syntax.asp) select elements on a page (called nodes) in a fashion that more resembles a file structure. You can still do similar searches for elements using class and id, but it doesn't follow the same format. To find an element with 'id=primary-title', you would use `"//*[@id='primary-title']"`. If you wanted to select all `

` tags with 'class=notes', you would have to use `"//p[@class='notes']"`. Unlike the CSS selectors, if you have this child node you can move upwards to the parent `` node by using `".."` just like you would in a file structure. If you're looking to start selecting page nodes with XPath, check out [this](https://chrome.google.com/webstore/detail/xpath-helper/hgimnogjllphhhkhlmebbmlgjoejdpjl) Chrome extension, it lets you hover over elements and gives you their XPath. #Scraping Speed My main curiosity was to find out if one or the other was faster at scraping a web page. To test this, I created a [website](https://github.com/aturkewi/site-to-scrape) with rails that has a thousand product pages. Each page is very simple and just has the name of the product, the price, and a sku number. I ran the server locally so there would be no variations in bandwidth or in serving the content. I used the HTTParty gem to get the pages from the localhost and the Nokogiri gem to scrape the web pages. I used the built in Benchmark library in Ruby to test speeds. ##Importing HTML and XML with Nokogiri One difference in the code between scraping with CSS and scraping with XPath is that CSS uses the HTML and XPath uses XML. Because of this, I had to import the product pages differently with nokogiri.

# The CSS scraper used:
Nokogiri::HTML(raw_page)

# The Xpath scraper used:
Nokogiri::XML(raw_page)
To make sure that this would not affect the test, I ran a quick benchmark to make sure that just getting the page with these two methods would yield equal speeds.

Benchmark import from Nokogiri

READING BENCHMARKS. The benchmark tests being used in this blog actually run twice. First is the rehearsal (marked as such in the results) and then the actual test done directly below. A rehearsal may be useful to use because if there are a lot of objects that need to be created, the first task that is run may get stuck with some initialization tasks and therefore skew the results. For this reason, the important test to look at is the actual test block run after the rehearsal. The main time you want to pay attention to is the time noted in the parenthesis. This is the total elapsed time to complete the task. For more information on what the other numbers mean how to to use benchmark, check out this blog.

This benchmarks shows that there may be a very small difference in loading the html (about a half second over 51 seconds).

Running the CSS and XPath Benchmark

For running the actual benchmark, the goal was to scrape through all 1000 product pages and collect an array of hashes that looks like this:

[{:name=>"Incredible Linen Lamp", :sku=>"564631335", :price=>"6"},  {:name=>"Enormous Wool Pants", :sku=>"532842039", :price=>"11"}, {:name=>"Lightweight Steel Table", :sku=>"894913920", :price=>"39"}, ...]

The results


Benchmark Results

The results of the actual test show that scraping with Xpath is about 2s faster (over ~57s) than scraping with CSS. Given that we already saw that Nokogiri accounted for .5s, I would conclude that the actual process of scraping with the different selectors amounted to 1.5s.

Conclusion

When scraping a few pages, the difference in speed between CSS and XPath is pretty small, but when scraping millions of pages, this small amount of time may start adding up. Beyond that case though, my initial conclusion is that scraping pages with either CSS or XPath both work well. XPath has a bit more functionality in terms of moving up the tree and CSS may be easier to pick up if you are already familiar with building web pages in CSS.

Rails Generate Commands

There are a lot of different options when generating a new part of your website through rails generate (rails g for short). Our options are rails g scaffold, rails g resource, rails g model, rails g controller, and rails g migration. In this blog post I want to go over what each generate command does so you can best decide which is right for your need.


Rails Generate Table

This table gives a basic overview of what what primary files are created (note, I left out the testing files that are created).

Mose of these rails commands can be used in their simplest form by typing in the command followed by the model name, followed by their database columns and types. Here is an example rails generate resource post title:string body:text published:boolean. For scaffold, resource, and model, the resource name is singular. The exceptions to how this is used are controller and migration. Generating a controller uses camel case and uses the plural and generating a migration will be more wordy. I'll go over each of these in their sections. If you ever forget, you can always just type in rails g ? where ? is the name of the command with no following text and rails will follow with examples and explanations of how to use that command.

rails g scaffold

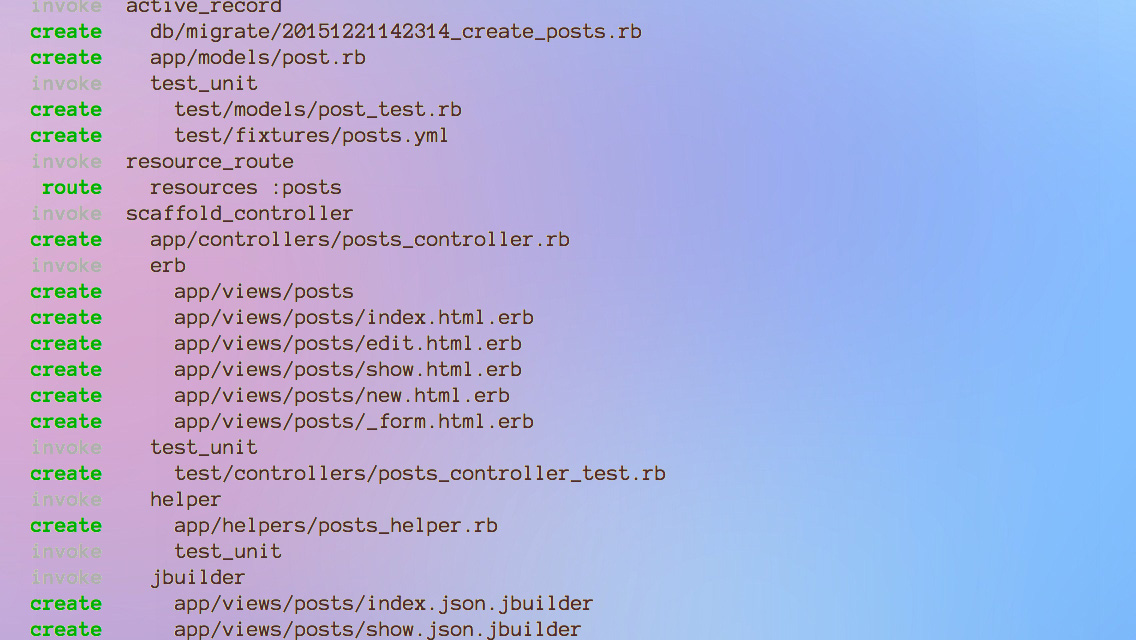
From the table, we can see that scaffold probably provides us with the most material compared to the other commands. While it does create all the same files as a 'resource', the big difference is that scaffold fills in views and the controller. This command and the resource command both give us the following line in our routes.rb file: resources :posts. This just gives the user access to all this pre-built good-ness right off the bat.

As far as views, scaffold gives you a 'new', 'edit', 'show', and 'index', complete with delete buttons. It is also worth noting that the scaffold command builds the 'new' and 'edit' page with another view file, a form partial. The top of the form partial generated from rails g scaffold Post name age:integer is shown below:

1
2
3
4
5
6
7
8
9
10
11
12
13
14
15
16
# app/views/posts/_form.html.erb

<%= form_for(@post) do |f| %>
  <% if @post.errors.any? %>
    <div id="error_explanation">
      <h2><%= pluralize(@post.errors.count, "error") %> prohibited this post from being saved:</h2>

      <ul>
      <% @post.errors.full_messages.each do |message| %>
        <li><%= message %></li>
      <% end %>
      </ul>
    </div>
  <% end %>
...
...

Even if you don't want to have all the fields you created in your DB on the form, you probably want to be able to at least return errors to the user if there is an error with their submission.

The other nice thing about the scaffold is that it generates all of the basic CRUD actions in the controller along with the option of returning JSON rather than HTML.

Scaffold really does a lot for you, but it can easily be overkill. Let's take a look at some other options as well.

rails g resource

Creating a resource is very similar to creating a scaffold, but without a filled in views or controller. As far as the views go, it just gives you an empty folder and the controller just gives you a file that correctly inherits from Active Record. This is a good tool if you know you are going to want to have an object that the user will be able to access, but don't automatically want all the CRUD actions laid out via rails convention.

rails g model

A model creates even fewer files for us. All we get is the migration and the model file. This is better if you are building an object that you want stored in the DB, but that you may not want the user to directly access. Another reason for using this option is if you would prefer to be more granular in the constructions of your site.

rails g controller

Generating a controller is a little bit different than everything we've looked at so far. The generate command uses CamelCase and is plural. Also, the options that you pass to the generate command are the method names you want in the controller. Here is an example rails generate controller CreditCards open debit credit close. Only the specified routes are added to the router and as this doesn't follow the most standard rails convention, the views it creates are just one or two lines stating their location:

1
2
<h1>CreditCards#credit</h1>
<p>Find me in app/views/credit_cards/credit.html.erb</p>

Generating a controller would be great for something that you want to show, but may not exist in the database. Another good tool for this is to use it in conjunction with model so you can get more control of the routes created for you.

rails g migration

Finally, we have the migration. This command creates the fewest files for you but it can be the trickiest to use. All this command does is create a migration file, but depending what you pass to it, you can create different types of migrations.

Create a new table

To create a new table use something likerails g migration CreatePosts name:string age:integer. The first thing you pass is CamelCase, starts with the word 'Create' and has the model you want to create as a plural. After the create, it works just like any of the other generate commands where we use column_name:data_type.

Add or remove a column

To add or remove columns you do something like rails g migration AddContentToPosts content:text. The general format here is AddXXXToYYY or RemoveXXXFromYYY followed by the columns you want to add or remove. The command written above for adding a content column to posts generates the following migration file:

1
2
3
4
5
class AddContentToPosts < ActiveRecord::Migration
  def change
    add_column :posts, :content, :text
  end
end

Closing thoughts on rails g

So those are the basic uses for the rails generate commands. Some important things to think about/remember:

  • You can always run the generate command and then go in an make change for things that didn't come out exactly correct (most useful for me with migrations).
  • Think about what method works best for you. Do you want to start small and build up your files? Or do you want to create everything and then cut files back?
Polymorphic Associations

What are polymorphic associations?

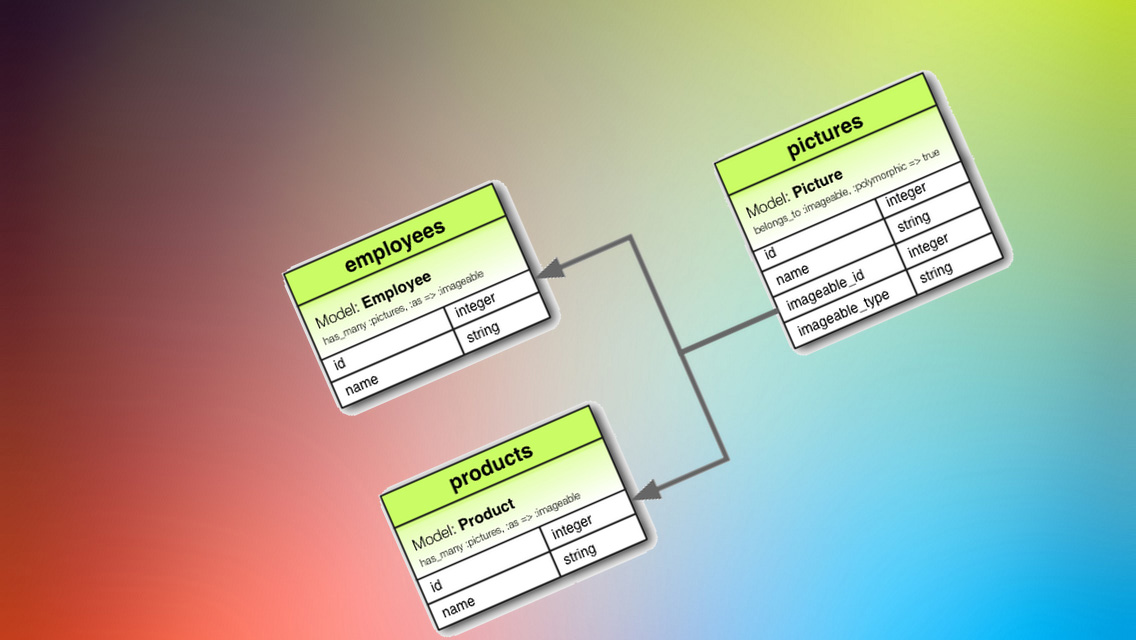
A polymorphic association is when a model can belong to more than one other model on a single association. For example, I have a favorites model that I want to belong to a user and the model that they favorited. Seems simple enough, but maybe the user wants to favorite and instance of the hospital model, or maybe they want to favorite an instance of the community gardens mode. Now you can see how this gets a bit tricky.


Something isn't right here...

As we can see from the diagram above, for the Favorite model to belongsto a User and belongsto one of multiple possible resources, we're going to need some more columns in the Favorite model. This is an ideal situation for polymorphic associations.

Setting up Polymorphic Associations

In setting up this association, I am going to assume that you have a User model already set up and the resources that you would like to be able to favorite already set up. Don't worry though, I'll walk you through changes that need to be made in those models to get this all to work.

Create Model

First, let's create the Favorite model by going to the console and typing in the following: rails g model favorite user_id:integer favoritable_id:integer favoritable_type:string

This will generate the following migration for us:

1
2
3
4
5
6
7
8
9
10
11
12
13
14
# db/migrate/123456789_create_favorites.rb
class CreateFavorites < ActiveRecord::Migration
  def change
    create_table :favorites do |t|
      t.integer :user_id
      t.integer :favoritable_id
      t.string :favoritable_type

      t.timestamps null: false
    end
    # Add this line:
    add_index :favorites, [:favoritable_id, :favoritable_type]
  end
end

Because the favoritableid and favoritabletype type are often searched together, we went to add an index for them. Make sure to add the line noted above to your migration BEFORE running rake db:mograte.

Add Associations

Now that our all our models are created (again, this is assuming you already have your user model and resource models already migrated) we need to start adding associations. Let's start by going to your Favorite model:

1
2
3
4
5
# app/models/favorite.rb
class Favorite < ActiveRecord::Base
  belongs_to :favoritable, polymorphic: true
  belongs_to :user
end

We need to add the two associations shown above. Line number 3 is the polymorphic association that will allow this Favorite model to belongsto one of many different model options. Line number 4 should look familiar, it is of course saying that each Favorite belongsto one user.

Good, that was easy! Now we just need to set up the other end of the association. Let's go to one of the models that you want to be able to favorite. For the purpose of this example, let's use Farmers Markets:

1
2
3
4
5
# app/models/farmers_market.rb
class FarmersMarket < ActiveRecord::Base
  has_many :favorites, as: :favoritable
  has_many :users, through: :favorites
end

Here on line 3 just adding a hasmany association to the favorites model as the keyword favoritable that we used earlier. Line 4 is the same hasmany through association that we would have used if this were a non-polymorphic relationship. Use these same two lines for ever model that you want to be favoritable.

Now we've set up the favorites model and we know how to set up our resources that we want to favorite. The last step is to set up the through association from our user to our resources.

Add Through Associations

The goal here is to set up our user model so that it can see it's favorite farmers markets and community gardens without having to do some complicated search like user.where(user_id:user.id, favoritable_type:'FarmersMarket'). To get this association we need to do the following:

1
2
3
4
5
6
# app/models/user.rb
class User < ActiveRecord::Base
  has_many :favorites
  has_many :farmers_markets, through: :favorites, source: :favoritable, source_type: 'FarmersMarket'
  has_many :community_gardens, through: :favorites, source: :favoritable, source_type: 'CommunityGarden'
end

On lines 4 and 5 we are simply setting up the association under the name we would be calling it ('user.farmersmarkets') and showing the course of how to find it (`through: :favorites, source: :favoritable, sourcetype: 'FarmersMarket'`).

Finished Product

That's it! We did it! Take a look below to see the polymorphic association in action. I set the variable u equal to a user and added a favorite community garden AND a favorite farmers market.

1
2
3
4
5
6
7
8
9
2.2.1 :002 > u.community_gardens
  CommunityGarden Load (1.2ms)  SELECT "community_gardens".* FROM "community_gardens" INNER JOIN "favorites" ON "community_gardens"."id" = "favorites"."favoritable_id" WHERE "favorites"."user_id" = $1 AND "favorites"."favoritable_type" = $2  [["user_id", 1], ["favoritable_type", "CommunityGarden"]]
 => #<ActiveRecord::Associations::CollectionProxy [#<CommunityGarden id: 1, name: "11 BC Serenity Garden", borough_id: 3, size: "0.054", created_at: "2015-11-06 15:57:01", updated_at: "2015-11-06 15:57:01">]>
2.2.1 :003 > u.farmers_markets
  FarmersMarket Load (1.0ms)  SELECT "farmers_markets".* FROM "farmers_markets" INNER JOIN "favorites" ON "farmers_markets"."id" = "favorites"."favoritable_id" WHERE "favorites"."user_id" = $1 AND "favorites"."favoritable_type" = $2  [["user_id", 1], ["favoritable_type", "FarmersMarket"]]
 => #<ActiveRecord::Associations::CollectionProxy [#<FarmersMarket id: 1, name: "Bissel Gardens Farmers' Market", borough_id: 1, day: "Wednesday & Saturday ", created_at: "2015-11-06 15:57:01", updated_at: "2015-11-06 15:57:01">]>
2.2.1 :004 > u.favorites
  Favorite Load (0.6ms)  SELECT "favorites".* FROM "favorites" WHERE "favorites"."user_id" = $1  [["user_id", 1]]
 => #<ActiveRecord::Associations::CollectionProxy [#<Favorite id: 6, user_id: 1, favoritable_id: 1, favoritable_type: "CommunityGarden", created_at: "2015-11-29 16:51:51", updated_at: "2015-11-29 16:51:51">, #<Favorite id: 8, user_id: 1, favoritable_id: 1, favoritable_type: "FarmersMarket", created_at: "2015-11-29 17:10:29", updated_at: "2015-11-29 17:10:29">]>

You can see that we are able to call both .community_gardens and .farmers_markets on the user. We can also call .favorites and get all of their favorites regardless of type.

I hope this was helpful, and best of luck setting up your own polymorphic associations!

Sources: